Creating HDR Images: Photography and Processing
Effective Field Data Capture and Creation of High Dynamic Range Images
June 4, 2009
Conceptual Data Capture
In 1997, Paul Debevec published a paper about how to digitally create high dynamic range images for rendering surfaces. This paper is very technical and includes the algorithm equations used to recover the film/camera response curve used to nonlinearly map pixel values found in standard images in order to produce true, absolute radiance values in HDRI. This paper is available from Debevec’s website.
As Debevec’s work has been employed in various software packages, including Adobe Photoshop and the very good Photomatix program, we will not cover the science and engineering research in detail, but rather the photographers’ steps to making an HDR image.
To begin, in order for the algorithms to calculate a response curve, there must be, at minimum, two photographs of the scene (but the more photographs, the more detail can be recovered and visible in the resulting HDRI). Most HDR software suggests/requires at least three bracketed images, but, as stated in the Why HDRI blog, the more the better!
‘Bracketing’ in photography is the technique in which a scene or subject is photographed multiple times with different camera settings (the specific settings bracketed can vary, and may include focus, flash, white balance, and exposure). For the purposes of producing HDRIs, we will want to bracket the exposure. Exposure bracketing means taking an image for the scene at a given exposure and then taking one, two, three, etc. frames progressively brighter, and one, two, three, etc. frames progressively darker. Some SLR cameras can auto-bracket for you; please read your camera’s manual to determine if this is possible and, if so, how to adjust the settings appropriately. Below is a figure of a Nikon DSLR with the bracketing settings displayed and highlighted by the red box.

The Nikon DSLR shows bracketing has been engaged with the "BKT" letters whilst also indicating that the type of bracketing selected with include both an image of increased exposure value (indicated by the arrow on the left of the dot pointing to the "+") and an image of decreased exposure value (indicated by the arrow on the right of the dot pointing to the "-").
Previously, bracketing exposure was generally used by photographers to have a selection of photographs to choose the most appropriately exposed image from the set. Now, with HDR software, we can use these multi-exposed images of a high contrast (or "high dynamic range") scene to combine them into an HDRI (please note that although digital software facilitates this technique, it had been done in the past by some photographers by printing parts of different exposed frames onto a single sheet of print paper, producing the same effect).
Although bracketing the photos and digitally merging them into a composite HDR image, there remains a problem with the display media (e.g., paper or computer monitor) still not being able to fully display an HDR scene properly due to device limitations (as discussed in the Why HDRI blog. In order to allow the visualization of your new HDRI, you must first process the image with a technique known as tone mapping. Tone mapping will convert the broader intensity levels and range of the HDRI to match our conventional, low dynamic range medias. Tone mapping produces an approximation based on the individual tone mapping algorithm(s) used and therefore there can be a noticeable difference in softwares. One of the most popular software program, and one I recommend, is Photomatix. Tone mapping, itself, isn’t new—just new to digital imaging. It, as an artistic technique, has been used for centuries and was employed by the great master painters who often used dark or white lines at contrast edges to increase the visually perceived dynamic range of the images tones to make a more realistic, life-like graphic. See the image below of El Greco’s 1590 La Agoria en el Jardin.

El Greco used saturated colors of opposing hues to increase the apparent dynamic range of the scene. He also painted black or white lines around the edges of contours. Our eyes determine contrast locally, so increasing the contrast at local edges increases the overall perceived contrast of the scene. (source: Jon Meyer)
Data Processing with Photomatix Pro
CyArk recommends always shooting digital photographs in the camera’s RAW format if the camera in use offers this option. RAW images can be loaded into a photo editing suite such as Adobe Photoshop or Adobe Photoshop Lightroom where the RAW files can be converted to TIFF format for quicker processing by Photomatix Pro. The RAW files can also be directly imported into Photomatix Pro, however this process causes Photomatix to run more slowly as it converts the RAW photos into a usable format. The step-by-step process in Photomatix is as follows:
1) In Photomatix, generate an HDR image by loading differently exposed images (the bracketed images captured) by going to
• HDR -> Generate
If Photomatix cannot auto-detect the exposure bracket settings, manually set the variance in exposure values (e.g., 0, -2, 2 for the corresponding photos)
2) Choose
• Align source images before generating HDR (which can be skipped if a stable tripod was used) and
• Assume standard tone curve
This will then load the images as a single frame and a window for the program’s "HDR Viewer", a magnified view window that can be used to ensure the images are properly aligned.
3) The next step is to begin the tone mapping process
• HDR -> Tone Mapping
The tone mapping window will appear.
4) In the Tone Mapping window, there are two options of tone mapping styles: "Details Enhancer" and "Tone Compression". Each compress the images in a different way; the “Details Enhancer” attempts to do just that—enhance the details of the image. This option can cause graininess if the images are not perfectly aligned or objects (e.g., clouds, cars, etc.) are moving in the images.
5) 16-bit images contain more image information than 8-bit and are the recommended output setting for greater detail.
6) The other options available in the window are adjusted ‘to taste’ best appearance, color saturation, contrast, etc. However, the same settings should be used for groups of HDR images that are to be processed together, e.g., the
images comprising a single spherical panorama.
7) A new, HDR TIFF image is created by default for 16-bit images. If a JPEG/JPG file is the desired final outcome, we recommend the 16-bit TIFF is generated and then converted in another program such as Photoshop or Photoshop Lightroom to an 8-bit JPEG/JPG file. Again, this is because 16-bit images retain the most image information and therefore detail (requiring less compression), and should therefore be generated as the base image for any other conversion into more compressed file formats.


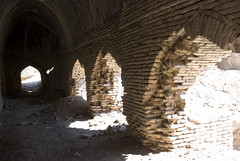
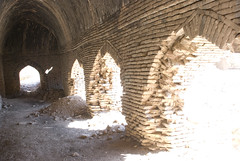
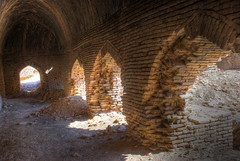
These images represent an example of HDR generation. Clockwise from top left: a regularly (auto setting) exposed photograph, the lower exposure photograph, the longer higher photograph, and the resulting composite and tone-mapped HDRI. Photos courtesy of Justin Barton.
